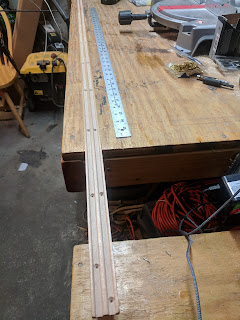
Above we see the slider tracks. They were of nice quality, straight and well machined. I cut down both to size and applied polyurethane to the sides and just the top surfaces of the ridges. I didn't want to apply any to the troughs where the doors will slide, to avoid stickiness. Instead, I'll apply wax to those areas. The track with the deeper troughs is the lower track.
The upper galley face floats, in a sense, as it's attached only at each side. The tracks are also deeper tan the 3/4" depth of the face, so I places a 1x2" board behind for support of both scenarios.
Above we see the upper galley face and the bare white 1x2" glued and screwed to the left of it. I later applied polyurethane to that as well. To mount the upper track to this assembly, I ultimately went with short brass screws. I countersunk holes into the track with the smallest countersink bit I had.
I think glued and screwed the track above to the assembly. Below is a short video where I examine the different sides of the assembled unit.
Right, so then we move onto the sliding doors. I found my best piece of scrap 1/4" birch plywood and cut the doors. I made them 27 1/2" wide and around 13" tall. The tallness depends on the build. My upper galley measured out a little bit different than plans. To deal with this, I measured and fine tuned with the upper track in place and the lower just resting in place. The doors and tracks will all go in place at the same time.
The two doors above were cut with a circular saw on the short sides and with a table saw on the long sides. I used a hole saw for the finger holes. Below is the left side door, mostly finished with sanding.
I'll finish the two doors up and mount in association with the lower track this week, I'm confident. I'll shoot for a March 1st deadline, that sounds good to the ear. It's good to see March arriving, but it's also not without good, unexpected progress for this year so far.
-g


No comments:
Post a Comment