Showing posts with label galley. Show all posts

Wednesday, September 5, 2018

Huge Teardrop Wrap-up

The two weeks since the last post became a blur of activity. We decided to take the teardrop camping for the Labor Day weekend. We'd wrap up all remaining road-worthiness details and let the rubber hit the road. Typical work proceeded in the two weeks between, up until the final days and hours before embarking on the trip on Saturday the 1st for Raystown Lake in Pennsylvania.


The mythical Teardrop spotted at Raystown Lake

It was ultimately successful. The week prior to the trip, I began working on the taillight and side marker lighting. I had parts arriving from etrailer.com and still a general sense of calm at this point.


 Wiring tail lights mounted in the hatch door


Both tail lights wired up, but not tidy yet


The wiring for this teardrop build vs. a typical utility trailer is unique for the taillights. The three wires must run through the galley door and some portion of them continues on through the conduit in the left side of the galley sliding cabinet. I'll produce a wiring diagram in time.

I'd also discovered that the wire colors on these taillights (driver's side, passenger side) I used was backwards. The white ground wire was fine, but the green and black were flipped. Thanks much to etrailer.com customer service answering my question about that so quickly!

That's important, since I zapped more money towards them that week for another set of side marker lights. And then did that again for yet another set, but this time with red lenses for the rear lights. You need orange up front, red on the rear markers.

With the wiring mostly in place, what else could there be? Oh, so much more! Only when faced with a deadline do all the little details ferret their way out! Here's a list I produced with only one week to spare:


Teardrop to do 8/27/18


  • Bend door trim into place 
  • Check for weather gaps 
  • Install wheels? TBD
  • Final bolt check 
  • Tongue height check 
  • Fix blinkers 
  • Install rear markers and finish front ones 
  • Tie up and tape wiring 
  • Weatherstrip tongue box 
  • Tongue box latch 
  • fabricate bumper 
  • weatherstrip bottom of hatch 
  • install hatch side brackets


All of this, and whatever other prep was jammed in between, continued up until 1:30 AM Saturday of departure. Plenty of time to spare!


 The bumper in place, no trim yet


Hatch lower latch in place

A big chunk of time was finishing the wiring, with plenty of splicing, cutting and twisting. Another black hole of time was the bumper. For something that's just made out of a hunk of 2x4, my application required a lot of trimming and cutting such that it fit the weird angle of my metal frame at the back.

I had to nail down some weatherstrip issues and gaps here-and-there, and thankfully none of it was tested through the weekend. What looked like three days of scattered thunderstorms turned into three days of blazing heat and sun - and all because I took the time to work out the weatherstrip. You can thank me later!

We jammed the rest of the packing together early Saturday morning and we were off to the lake for what turned out to be a great weekend. I'll drop a few more photos below, but have a full set in my other blog. There are still plenty of things to tweak and add to the teardrop, so this is hardly the end. Like a lot of things, the teardrop is never "finished", I just had to hit a deadline for road-readiness.

-cheers

Monday, July 16, 2018

Teardrop Trim, Wiring and More

I was on vacation last week, so there's been plenty of teardrop activities to discuss. This was a staycation with the direct purpose of accelerating the teardrop build. The tongue box is almost finally complete, it became a project just on its own.


It's now fully installed, with four mounting points on the metal frame rails. I had spent a bit of time looking for pre-fabricated boxes on the internet and couldn't find anything that met my specifications. I wanted a perfect spot to place the deep cycle battery, jacks, wheel chocks among other things.


This above is the interior of the tongue box, and a shot of the battery box in its mounted location. I've mounted it a bit off-center to allow for a small propane tank.


Above, the battery is in place with the battery box lid in place. I have a 20 amp main breaker in place above that for full system shutdown. I moved onto the cabin wiring again while I had the electrical tools in my tool belt. I wired in the 12-volt receptacle to the electrical raceway door, shown below, running wiring to the fuse box, ground bar and main bus bar.


In all its chrome glory, you see it below. It also works, which is always pretty fantastic.


To the left of the outlet in the photo above lives another receptacle slot that's designated for a household 110v receptacle tied to an inverter. I'm pushing that down the road a bit, I can only order so many parts at a time.

That brings me to the fenders that just came in from etrailer.com. Keeping with the accent motif, I'd ordered a pair of aluminum fenders in diamond plate.


Above is one fender on the workbench along with two side doors with a fresh coat of polyurethane on the inside surface. I sanded and cleaned up those surfaces earlier this week. The inside surfaces received two coats of poly, ultimately.

I had the fenders shipped in with the goal of installing them last week. Mission accomplished, as you can see below.


I had to pop the wheels off to install the fenders. I drilled five holes in the sides and mounted them directly to the walls of the teardrop with 3/4" screws. Note that I will be replacing the white wheels with alloy wheels and radial tires, which should fit the overall look better.

The next area to be tackled was the hatch weatherstrip, which is a trial and error endeavor. I settled on a solution for the hatch-to-side-wall interface that utilizes two different thicknesses of weatherstrip.


The space between the hatch door and the walls varies anywhere from 1/16" to 7/16", so I pulled some 5/16" and 7/16" foam weatherstrip off the rack from Home Depot. In the photo above, there are thicker sections upper and lower, with the skinny stuff in the middle. It works pretty well, even if it's not super attractive.

Back to the doors and trim. I'm working with 3/4" angle aluminum to fabricate outside trim for the side doors. I'm using a propane torch to heath the material and gradually bend it along the outer curved section of the side doors.


In the above photo, you see one of the old doors serving as a mold for the aluminum bending. I used the old doors so that there wouldn't be any heat damage to the paint while softening the aluminum. I did the bending while the door was vertically oriented in the workbench in order to provide downward pressure more easily. Heat, bend a small section, screw it down and repeat. While doing this, I drilled 1/8" holes in the aluminum butting against the door edges.

I'm currently working on the second door trim. Both will require some final trimming once they are mounted on the new doors. This may require some heat, but just a little. I think. Touch and go.

I'm on to the week after vacation, so time will be shorter. But I'm getting close to finishing, like you finish any project. You just hit a deadline, which is still nebulous, so I'm just steadfastly chipping along. Here's a photo to leave this post with me and the shop cat, Tommy.


-cheers


Thursday, June 28, 2018

Hurricane Hinge, Fire and Diamond Plate

Sorry for the incendiary title. I'm really nailing some things down these days, as I follow directly from that last blog post a few days ago. The lock set has arrived, I bought all the diamond plate that Home Depot had and another coat of Fire Red poly paint went on the sides.


Hurricane Hinge holding the hatch


First, however, I'll get to the topic of the hatch door to body hinge. Known as the Hurricane Hinge, it's a bit of a must have for teardrop construction. It's available on Amazon, from the same company that produces the door handles I'd also purchased. The key to the hinge is that it rolls over into itself, preventing water from flowing down into the hinge apparatus. Above, it's been permanently screwed to the roof, along with silicone sealant below.


Diamond plate and Fire Red paint are snappy together


Above, we have the custom tongue box with aluminum diamond plate sheeting on the sides. I used .025" thickness, since it's not providing structural rigidity. I applied Gorilla Glue construction glue between the box walls and the sheets and then riveted it on in several places. The lid is soon to come, after moving to other areas.


Onto the galley, where the hatch door now permanently hovers over, as I've said earlier. An interesting thing happened once the door was fully installed. The sliding doors in the galley were jammed. It looks like the 2x2" crossbar just underneath the hinge and above the sliders became less bowed. I had to pop the top face of the galley and trim the edges of the doors slightly. Fortunately, I designed the top face and slider assembly to be removable.


Hatch door locking mechanism


I also adjusted the drawer faces for better fit while I was in the neighborhood. They weren't quite straight with one-another. This was an appropriate time to install the hatch door handle and striker. This was a bit delicate. Install the handle and latch plate first, and then the goal is to determine where you want the hatch door to rest in "closed" position, and get that spot marked for the striker.


Hatch door handle all shiny and chrome


Looking at the above photo, I need to install a bumper, trim and weatherstrip around the hatch door. Another major task arriving soon is fitting the side doors and installing their windows, handles, locks and trim/weatherstrip. Still plenty to keep me busy!

-cheers


Tuesday, March 27, 2018

Cabin Doors, CPES and Some Hatch Work

Work continues on the cabin doors while Winter continues to hammer us with snow and cold temperatures. I'd expected to at least see some days in the 50s at this point in March, but I'm still blasting the propane heater for every teardrop session. I was anxious to see the 50s so that I could apply the CPES (Clear Penetrating Epoxy Sealer) with the garage open for ventilation. As Winter overstays its welcome, I've had to just plow through.


I've finished sanding and cleaning up edges and lines on both cabin doors, and you see one above with a coat of CPES. I had the garage door (the human version) open to at least balance temperature with ventilation. It's nasty stuff, but the Spring temps refuse to show.


With both doors coated with CPES, I used the remainder of the batch and applied it to areas of the hatch door above. I don't want to waste CPES, it's a bit expensive. The outer left and right ribs and adjacent surfaces got the attention, as well as parts of the two ribs inside those. Once that dried, the hatch door went back onto the teardrop with a  few temporary screws so that I could trim the bottom edge.


This was my final major trimming of the hatch door. The bottom edge, on the right side of the photo above, needed some trimming to normalize the gap between the door and floor when closed. The belt sander was a slow, but successful tool here. A couple hours of grinding away with the sander in that position is good for your arms and shoulders, right?


The hatch door made its way once again to the bench for more sanding and finally a motherlode of CPES. (I've been referring to it at EPS in more recent posts, I'll go back and fix that). I really overdid it. It's still in the 40s outside, and I opened the human garage door for ventilation, but the scent was still overpowering. I ended up with a headache after applying the CPES to such a large surface area. I woke up at 3AM with the headache as strong as ever and had to open the bedroom windows to the freezing air to solve this. I told you this stuff is nasty. I won't be doing another large treatment until Spring weather arrives. It's frustrating, since it's taking its time. I've got plenty to do in the meantime!

-g

Tuesday, March 13, 2018

Hatch and Galley Slider Doors Continued

March is here, and I wrapped up a few more tasks on the teardrop. It's all details now, it's just endless details that seem to spawn more details. Here's some details!


This was the hatch fit. The real-deal hatch fit, accomplished with actual screws once I'd dry-fit and trimmed and dry-fit and trimmed and... you get the idea. Just three screws to sanity-check the fit. I think the hatch door bowed out a bit, but it'll smash down when latched.


There will be some room in there for weather-proofing material once we're done. The key thing is that it's pretty "square". Here's an open look at the hatch door, tentatively attached.


I had to do some trimming of the upper edge of the hatch to deal with some oddities - the upper galley face for the sliding doors was a bit more aft than spec. Wood is nice in that you can adjust it with a belt sander.


That's the adjustment for clearance. This is where I recalled Mr. Miyagi's lessons: hatch on, hatch off, hatch on, hatch off... until I had the proper clearance. We move on to the galley sliding doors, which are now finished with several coat of polyurethane and pushed into place with the sliders screwed in.


The galley is structurally complete. There are some other details like power outlets, but that will come in time. I'll move on to the cabin doors now, whose fitment can be difficult. The hatch needs some wiring runs as well for the tail lights.

Until next time!

-g

Tuesday, February 27, 2018

Teardrop Tuesdays

Tuesday, and Monday, for that matter, are good nights to work on the teardrop camper. Two good nights alone, on otherwise uninhabited evenings after work. I continued to work on the galley sliding door situation. I finished sanding both doors and applied a coat of polyurethane to both outside faces.


While the first coat is drying on both, I countersunk holes in the bottom track.


I did these every six inches, alternating on the troughs. None of this is too exciting, but teardrop work was cut short by my day job doing network admin for some crisis. It wasn't the network, as we say in the industry, but you always have to prove it.

While the polyurethane "proves" itself, I ruminate on the next steps. A few more coats of poly on the doors, and it's inevitable to dry-fit the hatch door to check for fitment. March, you haven't stolen the show yet!

-g

Monday, February 26, 2018

Teardrop Galley Work

As February finds its way nearly out the door, I'm continuing on the galley tasks. The hatch door is resting for now with the hinge installed, as you see in my last post. I've since received the slider tracks in the mail.


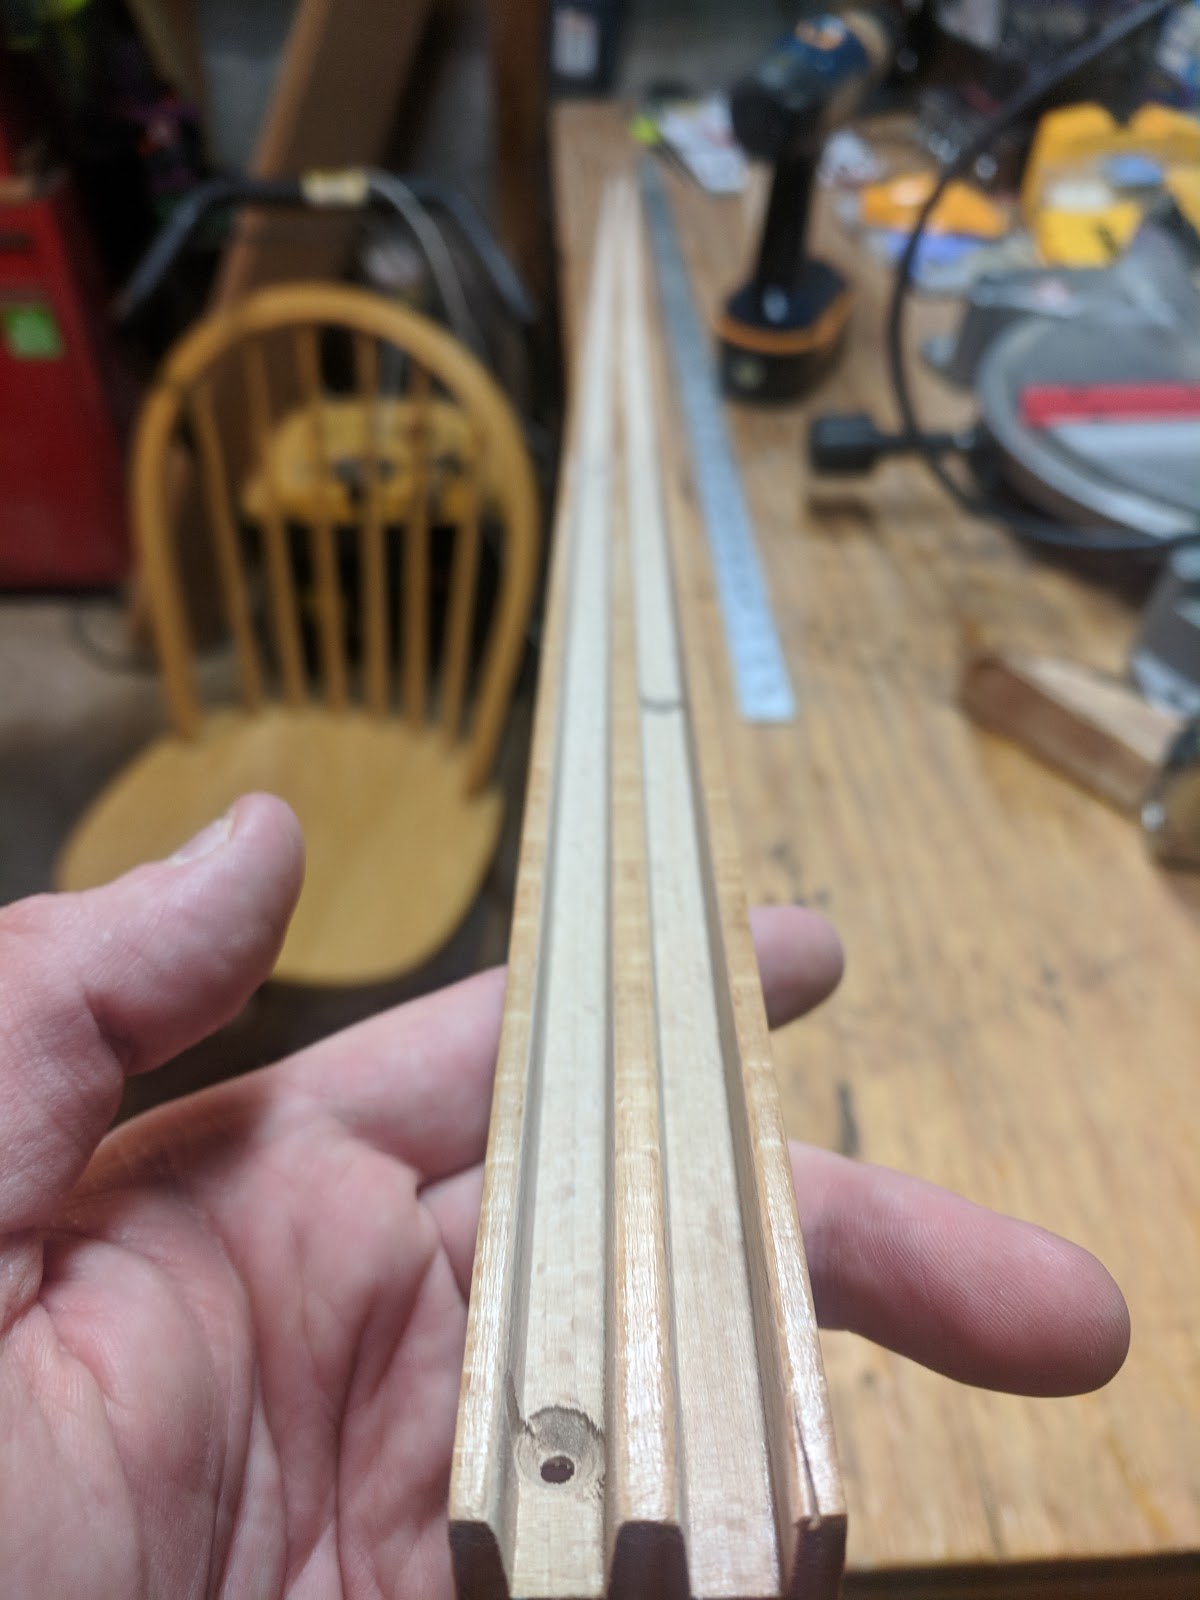
Above we see the slider tracks. They were of nice quality, straight and well machined. I cut down both to size and applied polyurethane to the sides and just the top surfaces of the ridges. I didn't want to apply any to the troughs where the doors will slide, to avoid stickiness. Instead, I'll apply wax to those areas. The track with the deeper troughs is the lower track.

The upper galley face floats, in a sense, as it's attached only at each side. The tracks are also deeper tan the 3/4" depth of the face, so I places a 1x2" board behind for support of both scenarios.


Above we see the upper galley face and the bare white 1x2" glued and screwed to the left of it. I later applied polyurethane to that as well. To mount the upper track to this assembly, I ultimately went with short brass screws. I countersunk holes into the track with the smallest countersink bit I had.


I think glued and screwed the track above to the assembly. Below is a short video where I examine the different sides of the assembled unit.


Right, so then we move onto the sliding doors. I found my best piece of scrap 1/4" birch plywood and cut the doors. I made them 27 1/2" wide and around 13" tall. The tallness depends on the build. My upper galley measured out a little bit different than plans. To deal with this, I measured and fine tuned with the upper track in place and the lower just resting in place. The doors and tracks will all go in place at the same time.


The two doors above were cut with a circular saw on the short sides and with a table saw on the long sides. I used a hole saw for the finger holes. Below is the left side door, mostly finished with sanding.


I'll finish the two doors up and mount in association with the lower track this week, I'm confident. I'll shoot for a March 1st deadline, that sounds good to the ear. It's good to see March arriving, but it's also not without good, unexpected progress for this year so far.

-g

Wednesday, February 7, 2018

Teardrop Doors and Hatch Progress

I've finished the trimming of the 2nd side door (1/8" on the flat sides) since my last post. I also sanded the edges to take the any spare snaggers or hard edges off. Both doors still need surface sanding for aesthetics and a myriad of others things like aluminum trim, EPS and hinges. That's for later. I moved on to the hatch in the meantime.


I pulled up the old "hurricane hinge" and cleaned it up. Old silicone sealer, wood veneer and other scum had to be cleaned off. I also had to trim some of the aluminum on one side for a different fit on the current hatch. Weird, but I think this hatch is more "square". Good.


I shaved down some of the top hatch interface with a belt sander for an equal surface and straight lines, then dry fit the hatch door portion of the hurricane hinge.


Perfect. I applied EPS to that horizontal surface you see above, and waited a bit for it to dry. I said I wasn't going to do it in February, but I bit the bullet, set the propane heater on high and managed to get a temperature of 50 degrees in the garage. It doesn't seem to drop below 40 at night, so it's fine.


I added two beads of silicone caulk to both sides of the angle here for under the surface of the hinge. I then screwed it down with 3/4" screws. I added some clamps to... squish the "topside" of the hinge down and distribute the silicone throughout that interface. Whatever, this sounds silly right now that I think of it. The shit was in there, no need for squishing.


Hey, I also ordered a solution for the upper galley sliding doors. I found some hardwood tracks on Amazon (as opposed to plastic units I've used before). Link below:

https://www.amazon.com/gp/product/B001DSZ3IW/ref=od_aui_detailpages00?ie=UTF8&psc=1

Once the tracks arrive, I'll build up the sliding doors with 1/4" birch that I have in stock.

Until next time,

Gus

Saturday, February 3, 2018

Galley Face and Doors

Progress this week, not bad. To tail from my last post, I started finishing the upper galley face and then moved on to the doors until I gather more materials and a plan for the sliding doors for the cabinet face.


Above, we see the backside of the upper galley face. We see the brackets that will sit against the backsides of the galley sides.


It's in place here. I used glue and stainless hardware. I now need to devise a way to have two sliding doors for this area. I didn't like a prior solution that I'd used for this. In the meantime, I've moved onto the doors, which were still in their rough forms of simply being cut from the walls.


First, I set out to trim an eighth of an inch from both of the flat sides. Above, I have set up a guide board for this purpose and took a belt sander to the edges. One door down so far, and then I began fitting the windows.


These particular windows take a bit of rough work to fit into the cutout due to screw heads and oddball metal extrusions. Get out the file, mini hacksaw and whatever else you can find to remove material until they fit. There's a flange on the outside of the window, which will hide some overzealous hacking, but take more care on the inside surface. It's nothing some additional trim wouldn't cover, however.


Here is one door above trimmed and with the window set in place. Both doors are set for windows at this point. I still need to trim the flat edges down on this, however. I quit for the day, after spending hours in the garage that I could only get up to 48 degrees with the propane heater. I will say, it's drafty enough in the garage to not pass out from carbon monoxide!

Which leads me to another point: I'm waiting on the window install until EPS (and polyurethane on the inside) until the temps go up a bit and I can keep the doors open for ventilation and also make sure the epoxy resin will set properly. It's still early February, so I'll keep finding other tasks to tackle until then.

-g

Saturday, July 8, 2017

Galley Trim and More Hatch Work

Ah Saturday, an actual real day off for most of us. I finished installing the hardware and mounted the galley doors.


I finished a few more sanding spots on the hatch and applied the ever-stinky EPS to the outside.


While I was working on the galley, I moved onto the last piece of trim that's been hanging out in the garage for a long time now. I had to do some trimming to the end of the piece below along with some trimming on the 2x2 spar that's at the top of the galley area.


Fits like a glove. I've got a coat of polyurethane drying on it now. Since I had a wet brush, I hit the spots in the cabin ceiling inside the cabinets. Minor oversight somewhere along the line. That's it for today, I think it's time to do an evening kayak paddle.

-g