Showing posts with label lighting. Show all posts

Wednesday, September 5, 2018

Huge Teardrop Wrap-up

The two weeks since the last post became a blur of activity. We decided to take the teardrop camping for the Labor Day weekend. We'd wrap up all remaining road-worthiness details and let the rubber hit the road. Typical work proceeded in the two weeks between, up until the final days and hours before embarking on the trip on Saturday the 1st for Raystown Lake in Pennsylvania.


The mythical Teardrop spotted at Raystown Lake

It was ultimately successful. The week prior to the trip, I began working on the taillight and side marker lighting. I had parts arriving from etrailer.com and still a general sense of calm at this point.


 Wiring tail lights mounted in the hatch door


Both tail lights wired up, but not tidy yet


The wiring for this teardrop build vs. a typical utility trailer is unique for the taillights. The three wires must run through the galley door and some portion of them continues on through the conduit in the left side of the galley sliding cabinet. I'll produce a wiring diagram in time.

I'd also discovered that the wire colors on these taillights (driver's side, passenger side) I used was backwards. The white ground wire was fine, but the green and black were flipped. Thanks much to etrailer.com customer service answering my question about that so quickly!

That's important, since I zapped more money towards them that week for another set of side marker lights. And then did that again for yet another set, but this time with red lenses for the rear lights. You need orange up front, red on the rear markers.

With the wiring mostly in place, what else could there be? Oh, so much more! Only when faced with a deadline do all the little details ferret their way out! Here's a list I produced with only one week to spare:


Teardrop to do 8/27/18


  • Bend door trim into place 
  • Check for weather gaps 
  • Install wheels? TBD
  • Final bolt check 
  • Tongue height check 
  • Fix blinkers 
  • Install rear markers and finish front ones 
  • Tie up and tape wiring 
  • Weatherstrip tongue box 
  • Tongue box latch 
  • fabricate bumper 
  • weatherstrip bottom of hatch 
  • install hatch side brackets


All of this, and whatever other prep was jammed in between, continued up until 1:30 AM Saturday of departure. Plenty of time to spare!


 The bumper in place, no trim yet


Hatch lower latch in place

A big chunk of time was finishing the wiring, with plenty of splicing, cutting and twisting. Another black hole of time was the bumper. For something that's just made out of a hunk of 2x4, my application required a lot of trimming and cutting such that it fit the weird angle of my metal frame at the back.

I had to nail down some weatherstrip issues and gaps here-and-there, and thankfully none of it was tested through the weekend. What looked like three days of scattered thunderstorms turned into three days of blazing heat and sun - and all because I took the time to work out the weatherstrip. You can thank me later!

We jammed the rest of the packing together early Saturday morning and we were off to the lake for what turned out to be a great weekend. I'll drop a few more photos below, but have a full set in my other blog. There are still plenty of things to tweak and add to the teardrop, so this is hardly the end. Like a lot of things, the teardrop is never "finished", I just had to hit a deadline for road-readiness.

-cheers

Wednesday, July 25, 2018

It All Hinges on This

The teardrop build is creeping along with a few more steps. A new taillight with license plate lighting arrived and I've been obtaining the door hinge hardware.


There they are, installed on the hatch door. There is a groove around the mounting surface for a bead of silicone caulk, which you can see squeezing its way out. Once dry, I'll peel that away, as usual.

I won't hold the title of this post in suspense any longer. I picked up 6 nickel-plated hinges and a bunch of 3/4" stainless steel screws for mounting. I have a set installed on one door so far.


Easy goes it, now that I'm back to work. A good chunk of my time is spent dealing with kayaks, rain, wiring my house for ethernet and other various things this week. You can't be on vacation all the time... or can you?

-cheers

Sunday, April 15, 2018

Teardrop Wiring: Raceway, Lights and Fan plus some Other Goodies

Spring 2018 started to show itself a bit a week or two ago. I decided to get into some wiring and also made my final decision on building a tongue box rather than buying one. The motivation was that I could customize the size to fit my needs. It'll be large enough to house the deep cycle battery and a full size propane tank. I'm not sure yet if I'll run a full size propane tank regularly, but perhaps for longer trips. 


Above, I'm cutting chunks of 3/4" plywood for the tongue box. The temperature was finally in the 50s again finally. Immediately the next day we had about 4 inches of show. Such is the new Spring here in Pennsylvania.


I've now mounted key elements of the wiring blocks in the raceway. Below, from left to right: busbar, ground-bar and fuse block.


The photo below is just a higher elevation view of the wiring raceway to provide a different angle. I have to break now to establish a milestone. Up to this point, the cabin lights and fan have been sitting quietly in place with the their wiring running through the ceiling and dangling into the raceway. I've finally terminated all that onto the fuse and ground blocks. The wiring from the tongue to the raceway is now also in place and connected.


With drums rolling, I set the battery on the tongue, popped in my fuses and flicked the switch on the main fuse...

We have power!


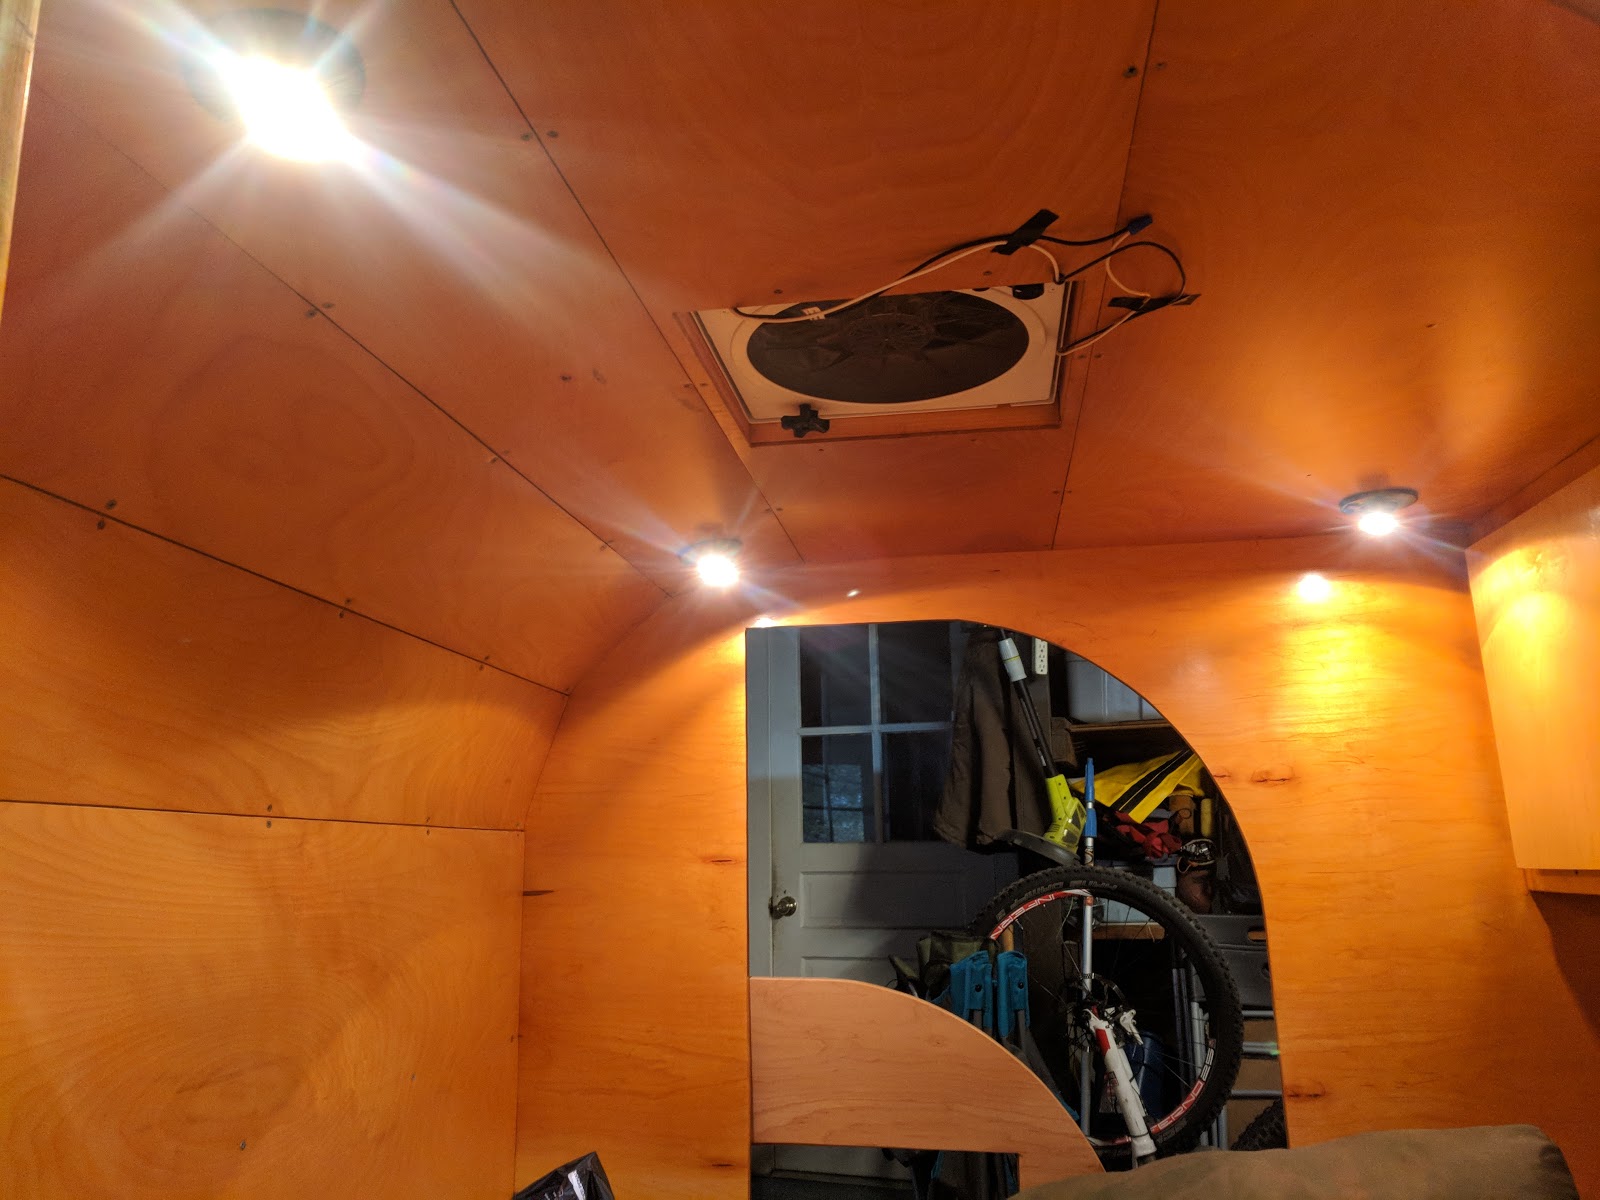
Ok, it's a minor accomplishment, but a good sanity check to ensure I didn't drive a screw through a wire somewhere up there. Below, I have two photos of all four cabin lights in all their glory.


I have the battery resting below with temporary connections, waiting until I have the tongue box built up. In the lower left of the photo you see the 20 amp fuse on the positive terminal side.


Below, I have a more focused view of the electrical raceway. On the left is the main busbar with the positive feed from the battery. The busbar breaks off at the top into the fan and two light feeds into the fuse block on the right. The middle block is the main ground. I'll post explicit wiring diagrams in a later post. I mean really explicit, NSFW (not safe for wiring more likely).


I've also tested the fan wiring, which you can see temporarily wired up in a few of the previous photos Final wiring for the fan will occur after painting and trim work. It was certainly a milestone to see the internal wiring operational.

I'll move on to the tongue box this week with a really nice battery mounting situation in mind, along with storage.

-g

Saturday, September 3, 2016

In rare moments of free time, I can get things done. Motivated by the new battery and the positive wiring tests, I ran the fan wiring and buttoned it all down in preparation for the last of the roof install.


That's the complete wiring for the four cabin lights and the fan (to be installed later). I have a shitty, loud fan/vent from previous projects, but I have to go for something better here. Below, you'll see the fan wiring hanging out and then the all the lights and fan wiring running out of the conduit to the wiring raceway.


Maybe, just maybe... I'll get this last piece of the roof installed this weekend. I'll have to dust off my precision circular saw skills once again, it's been a while.

[g]

September Teardrop Update - Wiring

It's been a while! I haven't ignored the blog, I really haven't had much time to work on the Teardrop with all the Summer activities going on, not to mention a busy August at work. I did manage to wire the interior cabin lights and drop the wiring down the conduit to the electrical raceway. Here's a view of the top:


I've had a bit of a hold up anyway, as I wasn't able to test these connections due to lack of a (good) 12v battery. Once tested, I can install the remainder of the roof. I think I even have the suitable plywood. Oh but what do we have here...


Yes, I just picked up a marine battery to power all your teardrop camper needs. I just tested the wiring, and all four lights fire up perfectly. There is one other thing before I close up the roof: I need to run the wiring for the ceiling fan. I should be able to get that done this weekend.

With Fall creeping up, maybe I'll have to time to get crackin' on this.

[g]

Tuesday, October 20, 2015

October Teardrop Progress

Ah, the crisp October air is rolling into the Northeast US and a busy two months of work and social stuff has calmed a bit. My last post was based on the galley drawers installation. Here, I have a batch of several activities recently.

I've completed a full three coats of satin polyurethane on the inside headliner. That was a prerequisite for the installation of the interior lights. Below I have a few shots of the headliner with the lights installed. These are adjustable angle lights with incandescent bulbs. There are replacement LED bulbs that will fit this application, however.


The satin polyurethane will cut down on some of the reflective quality in the cabin. In a small enclosure, too much reflection can be a little much. I've also removed the square section of the headliner that will accommodate the fan/vent. Here is a photo of that below.


The next chunk of activity centered around wiring the front interior lights. These are foremost, as I can then install the outside portion of the skin that stretches from the front of the teardrop to the rear of the fan opening after the wiring has been extended more towards the rear of the teardrop. Below, you can see the wiring as I'm running it towards the rear, traveling through the spars.


To continue the grab-bag of work, I've also cut the 2x2" spar that lives at the back of the headliner at the top of the galley. Note the photo below, and I'll describe some considerations with this.


The 2x2" spar fits flush with the top of the wall outline at the corner of the cutout for the eventual hatch door. On either side I had to remove some material so it would rest on top of the cabinet face and flush with the outline. I just used some jigsaw work to do this. Also note that I'd placed a brace between the top of the spar and the garage ceiling, as the headliner has enough torque to bow the spar upwards until it's been conditioned a bit.

Finally, I've drilled the hole for the wiring conduit through the bottom of the shelf area of the galley. I'l run a piece of conduit down from the headliner through this opening, which leads to the wiring raceway inside the cabin. This will carry the wiring from the interior lights and fan to the raceway, which is the electrical motherbrain of the teardrop. Below you'll see the hole that is nearly a few inches thick due to traveling through two hunks of 3/4" plywood.


I'm pretty much ready to grab that next piece of plywood for the outside skin. I need to test the front interior lights first before I seal that portion in, of course. As always, there is much more to do. As winter approaches, sunlight dwindles and the garage kerosene heater warms up, however, there will be more time to work.

[g]

Thursday, September 3, 2015

Teardrop Insulation, Drawers and Reinforcement

The clock has struck September, and I feel like I want to get things moving faster. The drawer slides came in from Amazon and I had some building to do there as well as more insulation and interior polyurethane. I was also able to start working on the galley drawers with the new slides in hand.

The reinforcement idea refers to the middle floor reinforcement stud, constructed from a 2x4 coated in roofing tar. It has cutouts top and bottom to align with the bottom of the floor and and clearance for the metal trailer frame as well as cutouts for the bottom lip of the frame. It essentially jams into the sideways U profile of the frame. Here's a photo below.


It's hard to see, but it's the black bar that's closest to the camera. Other portions of the floor are supported by the remaining metal rails, but the middle section has a fairly large gap that needs this reinforcement.

Other recent activity was completing the insulation around the aft interior light mounts. Below, there is a photo of the pieced-together insulation section.


The drawer slides arrived quickly this time from Amazon. They are decidedly Chinese in origin:


I've also laid down two coats of satin polyurethane on the interior headliner. I chose satin for the fact that it's less reflective than semi or full gloss polyurethane. Here are two photos below of the results.


The drawer slides are easily attached, while considering the alignment in the tiny space allocated in the Benroy. These are 9 inch slides, seen below on the largest of the drawers.


The mounting width is 13 1/2 inches in the design, so you have to build a spacer on the left and right side. Fortunately, my build evolved such that I could use a 1x2 inch stud on the left side. The right side required several inches of spacer, so I went with installing a 3/4 inch section of plywood to fill out the width. Photos of this build are below.


The plywood section on the right above is glued and screwed into the galley cabinet face and from the bulkhead from the cabin.

Teardrop work only comes in short bursts. A few hours at uneven intervals, so I have to move from subproject to subproject while poly is drying, for instance. I'm almost done mounting the slides to the drawers, and then I'll install them within the drawer area. I want to cut the ceiling fan opening soon, but I will verify that I'm using the same fan assembly first. The sizing is fairly standard, in any case.

The interior lights will get wired soon too. At least the front set, as I can then lay the next section of the outside skin, that would otherwise obscure the mount locations for the front lights.

I'd love to take a trip in late October with this camper, but I don't know if I'll make the build in that time. I'm going to shoot for that date anyway, because deadlines really do make you move.

Until next time, cheers. I'm going to finish my beer and call it a night.

[g]

Tuesday, August 18, 2015

Light Mounts and Miscellany

The teardrop build continues, and in short fashion since that last update. Maybe it's the summertime blues or the oppressive heat and humidity that veers me towards working in the cool(er) garage rather than mountain biking. I'm also a bit worn out during August due to work in higher ed. technology and need a side project.

I cut the remainder of the light reinforcements on the jigsaw and mounted the two near the front of the teardrop. Here they are, just glued and clamped down:


The light fixtures will screw upward into these blocks, holding the entire mess together. I opted for more burly screws than the ones packages for this task.

I then added the insulation across the entire section, cutting to fit around the blocks. Here's a closeup and a wide view.


I knew those odd sections of leftover insulation would be useful. I stalled at the light reinforcements due to only having four small clamps (you can never have enough clamps) and moved on to some other miscellaneous work. I added two more coats of polyurethane to the underside of the "rear flap" of the cabin headliner that protrudes into the galley. Below, you see the galley perspective and the flap that will fold over the sliding cabinet area of the galley.


This area will feature two sliding doors, left to right, where food items, rather than screws, will store. For this build, I intend to build a shelf that will split the vertical difference, providing additional room for plenty of supplies.

There are a number of tasks to do next in the near future. Behold, this list:


  • Install the rear interior light fixture reinforcements
  • Install the insulation on the panel with the rear interior lights
  • Finish the interior headliner with sanding and polyurethane
  • Cut out the section of the headliner for the roof fan
  • Install the galley 2x2 spar that will push the "flap" of the headliner down and thus seal the cabin
  • Run wiring out of the front light fixtures and install the outside skin over the front curve and the fan section
  • Or any other number of items in some other order

Of course, this is a lot of fun for me, and a great diversion. Until the next update, cheers.

[g]

Lights and Skin

I was on standby for work last weekend, which means I actually had a weekend where I was mostly home. That makes for a good weekend of building stuff! I picked up a 4x8' sheet of 1/4" birch plywood and a few other bits from Home Depot and set my sights on installing a piece of the outer skin and working on the interior lights install.

Outer skin came first. The garage is open for business, and I'm cutting the lower front outer skin. It was a bit wider than spec, so I adapted. This piece is something like 30 inches tall. I'd tell you precisely, but I'd have to rip the front skin off, as I'd written the notes on the inside.


This is the lower front section is its complete form. I've applied a weather proofing agent to both sides. The product is sourced from The Rot Doctor, and online retailer, and is called Clear Penetrating Epoxy Sealer (CPES). It's expensive, but builders swear by it. You can certainly feel the difference, the wood feels harder, which is quite evident if you've applied it over pencil markings and you try to sand them off.


The front of the teardrop will take on a good amount of weathering during travel, so this is key. Part of this is also treating the bottom inside of the panel that rests against the metal trailer frame with roofing tar. This stuff dries very hard and makes a great wood seal. You see this application below.


Here is the panel installed in the below photo. The bendy parts are up to come, as the next section up will be installed after the front cabin lights are in.


Like many things, the cabin lights install is part of a series of prerequisites. I want to at least polyurethane the inside headliner around where the fixtures will sit. Sanding before that. Really, I should just finish the interior headliner with a full sanding and polyurethane treatment. Regardless here is the process for installing these particular lights. Below are my placement measurements: 7" from the sides and splitting the headliner segment at 4.5". This could vary for preference.


Below, I partially disassembled the fixture so I could use it as a template of sorts.


I now cut out a keyhole-like hole in the headliner to accept the orbital portion of the lamp as well as the wiring/switch connector bit.


The next two photos are of a reinforcement for the assembly. The lamp screws into the wood as a surface mount, but 1/4" plywood does not provide much to grab onto. Pivoting the lamps, as they are designed, will eventually loosen up those screws. This block of wood will allow the screws to chew into something more substantial and also provide a boundary to butt the insulation up against. The open side allows for the switch/wiring block and also makes it easy to cut with a jigsaw.


That's it for the weekend. There was some good progress here, and hopefully I can get some more time into this in the coming weeks. Next, I'll cut the remainder of the reinforcement blocks and tack them down with some Gorilla Glue, waiting to screw the light housings into them from underneath. And then there're many directions I could take: sand and polyurethane the headliner, cut out the ceiling fan section, work on the galley... you get the idea.

[g]