Tuesday, and Monday, for that matter, are good nights to work on the teardrop camper. Two good nights alone, on otherwise uninhabited evenings after work. I continued to work on the galley sliding door situation. I finished sanding both doors and applied a coat of polyurethane to both outside faces.
While the first coat is drying on both, I countersunk holes in the bottom track.
I did these every six inches, alternating on the troughs. None of this is too exciting, but teardrop work was cut short by my day job doing network admin for some crisis. It wasn't the network, as we say in the industry, but you always have to prove it.
While the polyurethane "proves" itself, I ruminate on the next steps. A few more coats of poly on the doors, and it's inevitable to dry-fit the hatch door to check for fitment. March, you haven't stolen the show yet!
As February finds its way nearly out the door, I'm continuing on the galley tasks. The hatch door is resting for now with the hinge installed, as you see in my last post. I've since received the slider tracks in the mail.
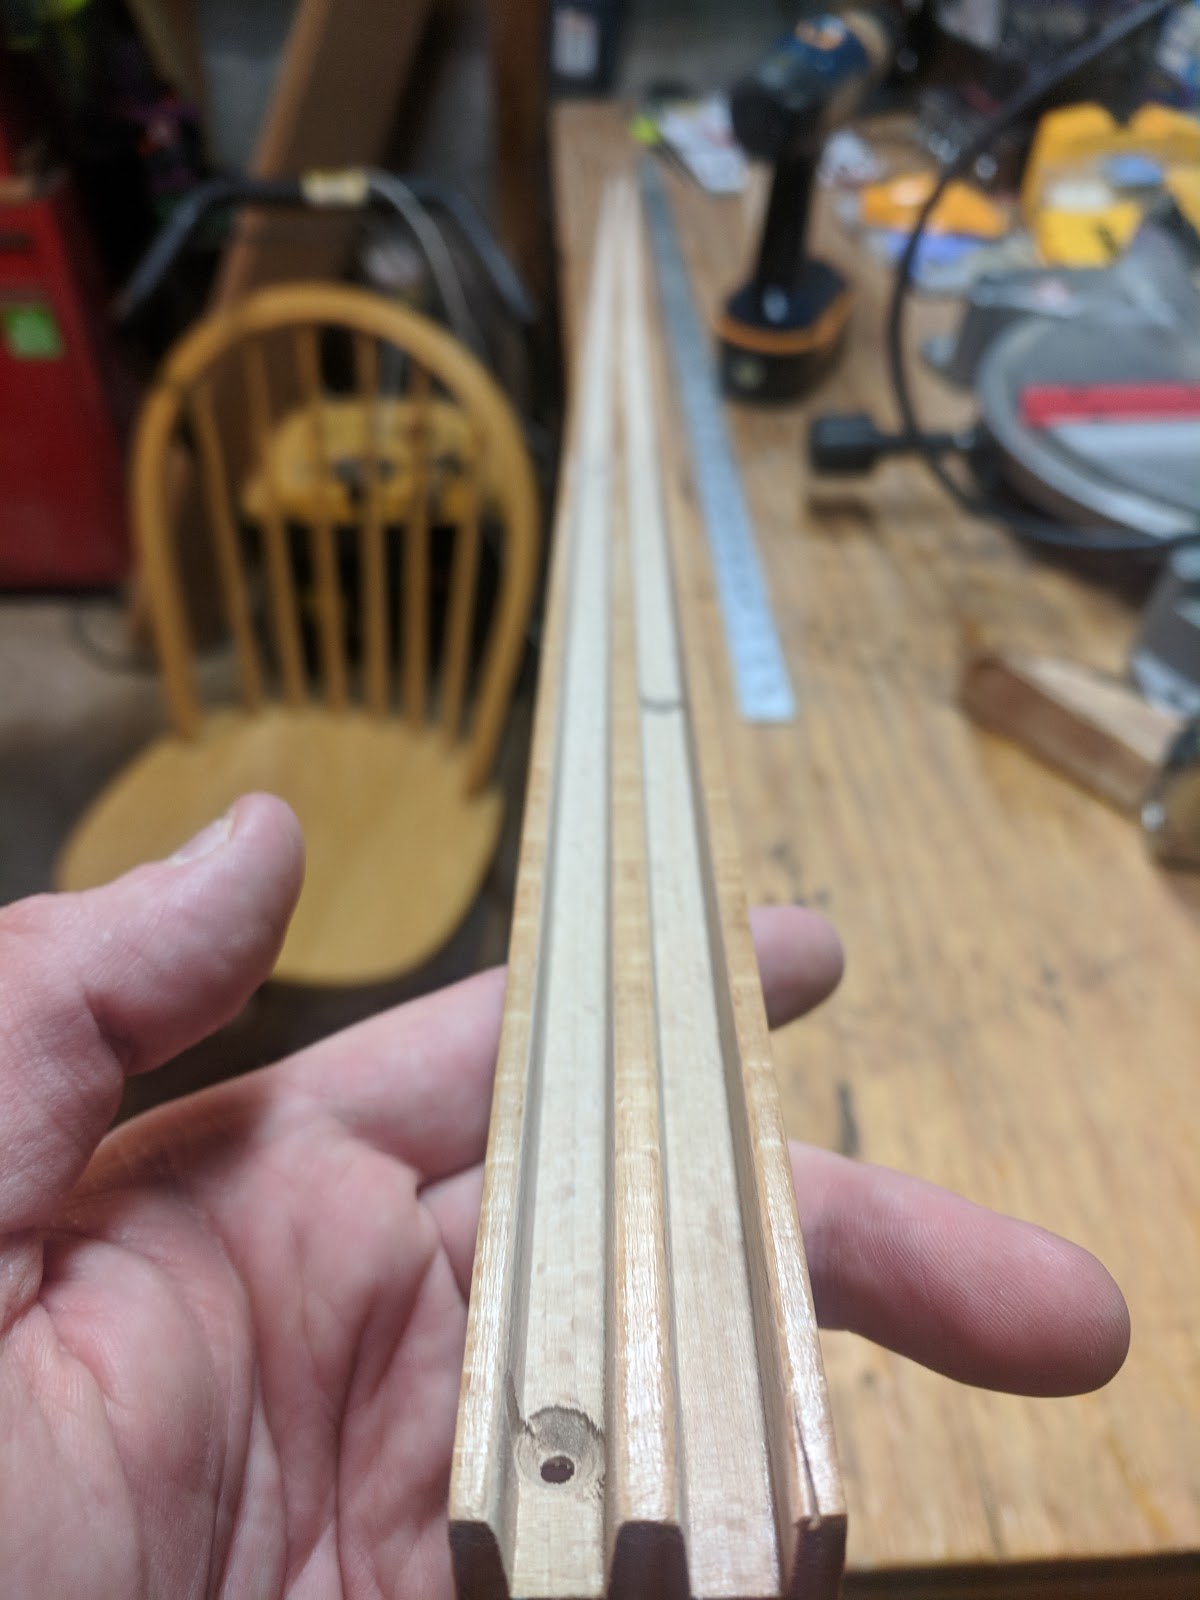
Above we see the slider tracks. They were of nice quality, straight and well machined. I cut down both to size and applied polyurethane to the sides and just the top surfaces of the ridges. I didn't want to apply any to the troughs where the doors will slide, to avoid stickiness. Instead, I'll apply wax to those areas. The track with the deeper troughs is the lower track.
The upper galley face floats, in a sense, as it's attached only at each side. The tracks are also deeper tan the 3/4" depth of the face, so I places a 1x2" board behind for support of both scenarios.
Above we see the upper galley face and the bare white 1x2" glued and screwed to the left of it. I later applied polyurethane to that as well. To mount the upper track to this assembly, I ultimately went with short brass screws. I countersunk holes into the track with the smallest countersink bit I had.
I think glued and screwed the track above to the assembly. Below is a short video where I examine the different sides of the assembled unit.
Right, so then we move onto the sliding doors. I found my best piece of scrap 1/4" birch plywood and cut the doors. I made them 27 1/2" wide and around 13" tall. The tallness depends on the build. My upper galley measured out a little bit different than plans. To deal with this, I measured and fine tuned with the upper track in place and the lower just resting in place. The doors and tracks will all go in place at the same time.
The two doors above were cut with a circular saw on the short sides and with a table saw on the long sides. I used a hole saw for the finger holes. Below is the left side door, mostly finished with sanding.
I'll finish the two doors up and mount in association with the lower track this week, I'm confident. I'll shoot for a March 1st deadline, that sounds good to the ear. It's good to see March arriving, but it's also not without good, unexpected progress for this year so far.
I've finished the trimming of the 2nd side door (1/8" on the flat sides) since my last post. I also sanded the edges to take the any spare snaggers or hard edges off. Both doors still need surface sanding for aesthetics and a myriad of others things like aluminum trim, EPS and hinges. That's for later. I moved on to the hatch in the meantime.
I pulled up the old "hurricane hinge" and cleaned it up. Old silicone sealer, wood veneer and other scum had to be cleaned off. I also had to trim some of the aluminum on one side for a different fit on the current hatch. Weird, but I think this hatch is more "square". Good.
I shaved down some of the top hatch interface with a belt sander for an equal surface and straight lines, then dry fit the hatch door portion of the hurricane hinge.
Perfect. I applied EPS to that horizontal surface you see above, and waited a bit for it to dry. I said I wasn't going to do it in February, but I bit the bullet, set the propane heater on high and managed to get a temperature of 50 degrees in the garage. It doesn't seem to drop below 40 at night, so it's fine.
I added two beads of silicone caulk to both sides of the angle here for under the surface of the hinge. I then screwed it down with 3/4" screws. I added some clamps to... squish the "topside" of the hinge down and distribute the silicone throughout that interface. Whatever, this sounds silly right now that I think of it. The shit was in there, no need for squishing.
Hey, I also ordered a solution for the upper galley sliding doors. I found some hardwood tracks on Amazon (as opposed to plastic units I've used before). Link below:
Progress this week, not bad. To tail from my last post, I started finishing the upper galley face and then moved on to the doors until I gather more materials and a plan for the sliding doors for the cabinet face.
Above, we see the backside of the upper galley face. We see the brackets that will sit against the backsides of the galley sides.
It's in place here. I used glue and stainless hardware. I now need to devise a way to have two sliding doors for this area. I didn't like a prior solution that I'd used for this. In the meantime, I've moved onto the doors, which were still in their rough forms of simply being cut from the walls.
First, I set out to trim an eighth of an inch from both of the flat sides. Above, I have set up a guide board for this purpose and took a belt sander to the edges. One door down so far, and then I began fitting the windows.
These particular windows take a bit of rough work to fit into the cutout due to screw heads and oddball metal extrusions. Get out the file, mini hacksaw and whatever else you can find to remove material until they fit. There's a flange on the outside of the window, which will hide some overzealous hacking, but take more care on the inside surface. It's nothing some additional trim wouldn't cover, however.
Here is one door above trimmed and with the window set in place. Both doors are set for windows at this point. I still need to trim the flat edges down on this, however. I quit for the day, after spending hours in the garage that I could only get up to 48 degrees with the propane heater. I will say, it's drafty enough in the garage to not pass out from carbon monoxide!
Which leads me to another point: I'm waiting on the window install until EPS (and polyurethane on the inside) until the temps go up a bit and I can keep the doors open for ventilation and also make sure the epoxy resin will set properly. It's still early February, so I'll keep finding other tasks to tackle until then.